Let’s add a class=”author-img” to our HTML picture, and add the following to our CSS:
.author-img {
  float: left;
}
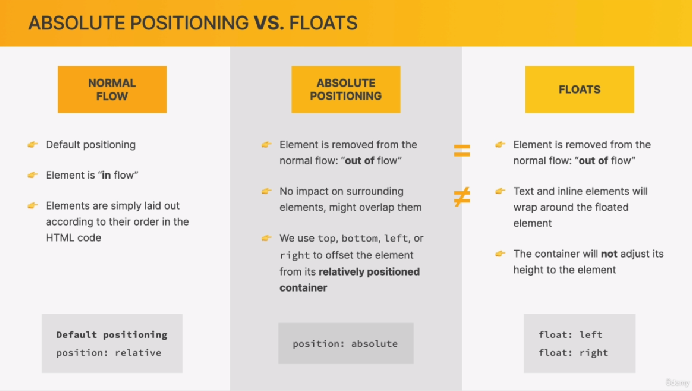
This will act like an absolute positioning element. It will pull the .author-img out of the normal block (all by itself) position, and now everything else will “float” around it.
- So now, the paragraph around it will squish to the right of the picture-image, and the things below it are squished to the bottom of it, too.
- If a long paragraph is next to it, the paragraph will wrap around the picture.
- If you try to put a padding-left to the paragraph next to it (to get more space between them), it won’t work how you think it should. The padding-left will slide under the picture, and will not make any difference until you pad wider then the picture.
Tip: In VS Code you can add extra words or text by typing lorem, and pressing enter or tab. And VS Code will add a paragraph of random latin words to fill up space.
- Also typing “lorem10” will give you 10 words specifically.
Tip: In VS Code you can move a line up or down, instead of cut and paste, by going to the “Selection” tab and clicking on the appropriate thing or:
- Move line down= Alt + arrow down
- Move line up = Alt + arrow up
Let’s add a class-”author” to our HTML paragraph, and add the following to our CSS:
| .author { | |
| padding-left: 80px; | To move it past the 50 px width picture |
| padding-top: 10px; | To center or lower the text below the top of the picture edge |
| float: left; | To “float” the text left of the picture, which will give the full |
| } | padding-left effect (80px) between the picture & paragraph. |
Let’s change it again:
| .author { | |
| /*padding-left: 80px; */ | |
| padding-top: 10px; | |
| float: left; | We need the “float” for margin-left to work. |
| margin-left: 20px; | Now there is 20px between the picture & the paragraph. |
| } |
| float: right; | The whole paragraph will “float” to the right side of the page. It will be right justified. |
Important note: If all of the child elements are “floated”, then you will lose your background color height, for example. Items that are “floated” are taken out of the normal containers (it is like they are not on the page anymore), and without anything inside a container, it is said that the elements height has collapsed.